
On the 10th Day of Stitchmas: Wine Bottle Gift Bag
- Laura Kasowitz
- Dec 19, 2016
- 5 min read

I had big plans and high hopes for the "12 Days of Stitchmas" but I think that it's all going to have to wrap up with the 10th day! While I could slap together 2 more days I think the time might be better spent baking some cookies and watching some Christmas movies with my family this year. So please accept my apologies and this final tutorial! It's so easy to do, you can whip up a few of them in an hour. And if you're like me you have lots of wine corks to make use of!
So without further ado...

Wine Gift Bag Tutorial
Materials:
- (1) Fat Quarter (FQ) main body fabric
- (1) FQ cuff fabric (you can get several cuffs out of this piece)
- approx 2' ribbon (I typically use between 1/8" and 5/8" ribbon)
- coordinating thread
-Optional: (2) corks and eye screw or floral wire
-Optional: 14" small scale trim (not shown)
Tools:
-Sewing Machine
-Standard tool kit (scissors, snips, pins, grid ruler or similar)
-Iron and pressing table/ironing board
-Optional: Quarter inch foot
-Optional: Rotary cutter and mat

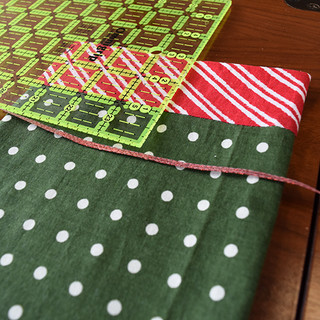
1. Using preferred method cut your fabric. Main body: (1) 14"w x 13"h. The width wraps around the bottle. Keep the pattern in mind as you cut it! Cuff: (1) 14"w x 4.5"h.

2. Place the cuff's right side (RS) against the body piece's wrong side (WS), aligning long edge. Note: if you want to add something fun like pom pom trim now is the time to do it. Align the bottom edge of the trim on the RS of the body piece, making sure the fun part of the trim is facing towards the bottom edge of the body piece.

3. Pin along long edge.

4. Start rolling up the bottom of the main body piece towards the pinned top. Keep it nice and even and keep on rolling. Ok, when you get the point where the cuff bottom is showing, pull the cuff edge over your rolled body piece and match the the bottom long edge of the cuff with the upper long edge of the cuff and transfer the pins. Now the pins should be holding together the upper and lower edge of the cuff and the upper edge of the main body piece. Make sure that the rolled part of the body piece isn't caught in the pins!


5. Sew along the pinned edge with a narrow seam allowance (SA), backstitching at both ends (super important!!). I like to use a quarter inch presser foot for this, but you can use a regular presser foot and keep the raw edges aligned with the right edge of the foot. Again, make sure you don't catch the main body roll in the seam!

6. This all sounds weird, I know. Stick with me here! Once that seam is done start pulling your main body piece out. It's kind of like turning a sock right side out. Just start pulling. Pull some more. Keep on going until-- POP!-- it's all turned right side out and looking super fancy. Press the cuff up and flat. Flip it over and check out how beautiful that cuff is looking.


7. Fold the piece in half, wrong sides together with the cuff pieces aligned. Yeah, I said wrong sides together. We're making some french seams here! Start pinning along the raw edge side and the bottom. I like to start where the cuff/main body seam meets to make sure that's aligned.


8. Again using your quarter inch presser foot, or the edge of your regular presser foot, start sewing up near the cuff. Make sure to back stitch. Sew down the long side, when you're approximately .25" from the bottom, pivot (sink your needle, lift your presser foot, turn the project so the short side is aligned with the presser foot, lower your presser foot) and sew down the short side, back stitching at the end.


9. See my stitching? It should look like this now!

10. Give the corner a snip, close to but not through the line of stitching. This makes it turn cleanly. Also take a look at your seams. If you feel that your seams strayed a bit from a quarter inch now is the time to take a sharp pair of scissors and CAREFULLY trim down your seam allowance closer to the line of stitching-- but not too close! You're just trying to replicate a quarter inch seam allowance.

11. Turn the bag WS out and poke out the corners. Give it a press flat. Switch back to a regular presser foot and sew with a 3/8" seam allowance. Your basically trapping the raw edges from your first side/bottom seam inside your new seam. It's going to look sharp, keep with me here! Sew down the side and bottom, pivoting as you did before. Remember to backstitch!

12. Turn the bag RS out and press again. Take your ribbon and find the center point of the ribbon and one side of the bag. Measure down 3" and center the ribbon on the bag. Using a coordinating thread color stitch over the ribbon a few times. Make sure you're only sewing the ribbon to one side of the bag! You have to fuss with the bag under the presser foot a little to make sure the bottom side is out of the way.


13. Yay! Technically you're done! So easy isn't it? But if you want to add that little extra touch add some corks (if you're like me you've got a tin of them around somewhere in your kitchen!). Take your small eye hook, or twist a thin piece of wire to the approximate size of an eye hook, and screw it in to the top of a cork. Tie off each ribbon end through a cork. Done!

Extra little tip: You don't actually need coordinating thread for any part of this project except for sewing on the ribbon. I don't always have a spool of the color I need, especially at the studio. However, I do have a large collection of random bobbins that students have left behind. You can use a bobbin on your spool pin for teeny bits of sewing! (Can you also tell that I had lost all day light in the studio by this time?)

I'd love to see the gift bags you make! Please share them on our Facebook Page so I can pretend that we had a festive Sip n Sew party while making them!
Merry Making and Happy Stitches to you!
Want more? If you have a special project that you would like guidance on, set up a private lesson! We have limited availability in February and several spots in the months after! Use your machine or one of ours and we'll get you sewing in no time! Contact us today!