Summer Camp Spotlight: Fabric Design + Sewing
- Laura Kasowitz
- Aug 18, 2017
- 7 min read

To say this summer was a whirlwind would be an understatement! We had a total of 5 weeks of camps with 7 different themes! (Plus, you know, all those other summer things like my kids going to camp and swim lessons and vacations and honestly, where does the time go??)
I thought I was going to throw all of these camps into one Summer Wrap-Up post but, as I went through the photos and was reminded of all their hard work and beautiful results, I've decided to feature each of the camps in a different post.
First up (which was actually my last camp of the summer) is the Fabric Design and Sewing Camp
One of my first day-dreams about Hartford Stitch was to offer a camp where kids would learn different design techniques and print their own fabric to sew with. This is the second time I've offered this camp, and with all the ways to design fabric, I think I can offer it a dozen time over with different techniques every time!
A few days before this camp started I realized that I had an older bunch of kids (10 and 14 year olds) and we could put an educational twist on the designs as well.
*Please note: Hartford Stitch is a participant in the Amazon Services LLC Associates Program, an affiliate advertising program designed to provide a means for sites to earn advertising fees by advertising and linking to amazon.com and any other website that may be affiliated with Amazon Service LLC Associates Program. I only recommend products that I personally use and like!*
Mud Cloth:
First we learned about Mud Cloth, also known as Bogolanfini. We talked about the process, the colors and the meanings of the designs (you can find a ton of great information from Africa Imports and Design*Sponge if you want to learn more!).
The campers were challenged to come up with their own designs. They could use inspiration from the Mud Cloth samples we looked at (whether they identified with a particular design or just liked it), could come up with a design that was important to them, or use the medium to make a fun design.
The Process:
Mix a Flour Paste from 1 cup of all purpose flour and 1 cup of water. It will be goopy.
Pin your fabric (we used white quilting cotton) to a piece of cardboard so it doesn't shrink up too much when it dries.
Spread the flour paste evenly over the fabric.
Working quickly, use a blunt tool to trace your pattern into the flour paste. Try to get off as much flour paste from the design as possible.
Let the flour paste dry. We left ours overnight and I still had to put it outside in the sun to make sure it was super dry.
Mix together paint. We realized after our project finished, that thinner paint would give more of a "dye" effect which means it would hold up well to the scraping step. I thinned regular craft paint with water, but you could also use fabric paint and water, or regular craft paint with a textile medium, to make it washable.
After the paint completely dries, crumple the fabric to start breaking up the flour. Get off as much as you can like this.
Wet the fabric and let the flour soften. Using a scraper (one of those silicone pot scrapers works great) start scraping off the flour. Go carefully in the beginning to make sure you're not scraping off all of the paint details as well. This is quite the process. The more "dyed" the fabric is (the color having seeped into the fabric instead of just sitting on top) the easier this part of the process goes.
The Verdict:
This method started with the most excitement, but I think the campers were the least impressed with the results. A lot of the detail was lost in the process because we should have thinned the paint more. Also, during the drawing step, some of the campers had smoothed out the flour paste repeatedly to change their design. In the process, they worked the paste into the fabric so it couldn't hold the paint as well.
Batik
Next up was batik! While batik has many origins, Java, Indonesia is best known for their designs. We talked about different methods of "resist" including how to do batik with beeswax including checking out some Javanese batik Tjaps I purchased at Brimfield years ago.
The Process:
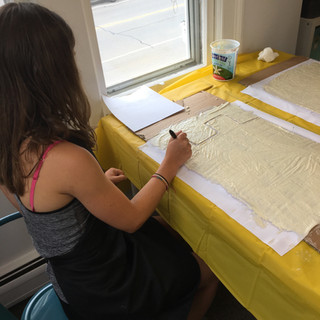
Mix all purpose flour with water. This time we wanted it a little stiffer than the Mud Cloth resist so it could hold its shape but not so stiff that it wouldn't soak through the fabric a little.
Put into a quart size Ziploc (don't close the top) and snip a very small part of the corner off.
Pin down the fabric (less important than in the Mud Cloth but still helpful).
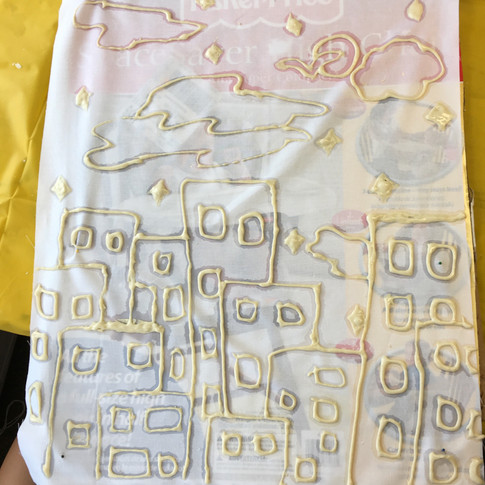
Using the bag like a pastry bag, squeeze the design on to the fabric. You can make a sketch ahead of time to trace over repeatedly (like the sail boats), or make an inspiration sketch and then free hand draw it on the fabric (like the buildings) or just go wherever inspiration takes you (like the squiggles).
Let it dry overnight.
Thin the acrylic paint slightly with water or textile medium, and apply with a sponge brush right over the flour paste resist. We found that the paint that wasn't thinned as much had less of a chance of seeping through the resist and gave clearer definition.
Let this dry as well.
Scrape off the flour paste. We found this came off pretty easily (and it was super satisfying to chip off).
Since we used craft paint it left the fabric with a pretty stiff feel to it. This was fine for our projects but a thickened dye may work better for other uses.
When things sort-of-kind-of go wrong AKA Happy Accidents:
I loved this building design as much as the camper did, so we were both a little crushed when we realized the paint was too much and seeped right through the resist (the first picture was after we scraped off the resist). However, there was an awesome pattern of paint on the plastic tablecloth underneath, so I quickly cut another piece of fabric that we pressed down on top and got the blue print on the right in the second photo. After lamenting the batik-gone-wrong we tried rinsing out the paint before it dried to see what would happen. As you can see in the right photo, the resist actually held some of the paint in place while the other parts rinsed out. Not what we expected but the effect was very cool!
The Verdict:
This one got a better response than the Mud Cloth project. Plus it was super satisfying to take off the resist.
Solar Fast
Lastly we played around with Jacquard's Solar Fast dye which is similar to making a cyanotype (which doesn't have a cool back story but was invented somewhere in England in the 1840s). This product is so much fun and after a couple of days of preparing a project and waiting for to dry, then adding another layer and waiting for it dry, and so on, it was fun to have some immediate results.
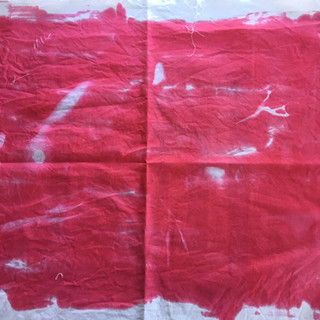
You can read up on the process on Jacquard's website, but the basic premise is that you paint this solution on to fabric in a dark-ish room, place your items on top and then expose it in the sunlight. We used what we had on hand in the studio (see the first photo with scissors) and what we could find outside (the white dots on red are gravel).
This was one of my favorites. It's hard to tell from the image, but the camper used a sponge brush to dab on the dye solution and then scattered pins on top. The result was a watery constellation look that was gorgeous!

And since I was on an Around-the-World of Fabric Design kick, I explained a little bit about shibori, the Japanese resist dyeing technique. To do this with the Solar Fast we folded the fabric and clamped it tightly then dipped each side for 10 seconds or so in the dye solution before exposing.
The end results weren't quite like real shibori, but we did get some neat patterns and color separations.

The Verdict:
Super fun and instant gratification!
Now on to the sewing!
When we were designing the fabrics, the campers had a difficult time seeing past what I call the "art project approach". Kids in particular are used to seeing a canvas (in art class that may be a big piece of paper, in sewing camp it's a big piece of fabric) and picturing how to use that piece of fabric for one big design, as if it were a piece of work to be hung up on a wall. There's nothing wrong with that of course (in fact I was rooting for the Koi Fish and the building to be made into wall hangings!), but fabric design has the unique potential to be used for another work of art.
Needles to say, it hit home when we got to the sewing part of the camp and I asked the campers to look at their fabrics in 7" x 10" or 16" x 16" pieces instead of one gigantic piece. There were some sighs, some exclamations and some raised eyebrows but you could tell it finally sunk in what they were doing.
Not every student had sewing experience, and since they were an older, independent group, we did away with my original projects and I let them choose their own. Pillows and pouches were a favorite for the fabrics we could bear to cut up. Bags were the winner for the "statement pieces".
I loved every minute of this camp. Even though there's always that hold-your-breath-what's-it-going-to-look-like unknown element of fabric design, the campers were up to the challenge and embraced all the wins and losses that can come with it. Plus... two of them had never sewn before?? Look at those projects!!


Comments